Many coaches and trainers new to the virtual workplace ask many “how to” questions around virtual facilitation and exercises. I’ve converted many location-based exercises to online using a wide range of tools. This is a LONG post, but I wanted to explain my typical approach and provide an example.
A friend of mine, Mark Levison CST, asked the following on Twitter:
Which pointed to this explanation of the Jumpstart Storytelling exercise run as a location-based exercise. You might want that explanation next to this one to see how you may adapt this into an online exercise. I’m assuming you have good in-person facilitation experience.
Find the key physical steps in the location-based exercise
In reading through the steps of the Jumpstart Storytelling exercise , I find the following “physical steps” (paraphrased) that I’ll need to translate into a virtual environment:
- Divide participants into groups of 6
- Each person gets 90 seconds
- Get everyone to switch groups with as many new faces as they can find.
- (for debrief/plenary) – Ask everyone to remember the most powerful story, go over to that person, and place your hand on their shoulder.
Consider three options to replace physical steps with virtual steps
Typically, I’ll group the physical steps into similar activities and look for online solutions that could replace them. I like to try to find at least three options to consider. If I can think of three options, I can probably think of more.
You might think: “How do I pick options when I don’t know the tools?” As a tool geek at heart, I’m always experimenting with tool capabilities. If you don’t have this habit or available time, you might want to tap into an online community that has experience with a wide range of online tools. Note I said “experience” and not opinions. Don’t accept tool advice from someone without practical experience. Tool evaluations don’t count.
Now, let’s group the physical steps from the Jumpstart Storytelling exercise and come up with some options for virtual steps.
Physical Step – moving into breakout groups
The first and third physical step from our list above can be grouped into one.
- Divide participants into groups of 6
- Get everyone to switch groups with as many few faces as they can find.
These two steps are similar since they involve people moving between groups. One virtual option is breakouts spaces. These are spaces or “rooms” where participants of the “main room” divide into separate rooms for smaller group conversations. Attendees in one breakout room can only hear and see (with video on) each other. Tools like Zoom.us, VideoFacilitator.com, whereby.com (formerly appear.in), and others all provide breakout spaces, but with very different capabilities.
Option 1: Zoom
These days, many people throughout the world are familiar with Zoom, but they may not be familiar with how to setup breakouts. All versions of Zoom provide a breakout option. However, the option is turned off by default. You need to hunt for them in the advanced settings and turn that option on before you start a meeting.
Also, breakouts are only controlled by the host. Participants cannot move themselves around by default. (Yes, there is a hack but I’ll talk about why that’s a bad idea in another poste.). However, Zoom can allow you to select who goes into each breakout room or allow Zoom to select randomly. These Zoom breakout assignment options work well for small groups as well as larger groups of 50-60 online.
Option 2: VideoFacilitator
VideoFacilitator entered the online meeting market in 2019 with some familiar capabilities implemented in a very unique way. With the founder having a strong desire to support self-organization, breakouts in VideoFacilitator allow anyone to move to any breakout room. The host merely sets up the number of rooms needed. As a facilitator that supports both location-based and online facilitation, this means you can give the same directions to participants to self organize. I’ve seen this option work very well for small groups to larger groups up to 50.
Option 3: DIY Breakouts
Perhaps you have a meeting tool that does not support breakouts. Running multiple instances of the meeting tool provide a basic set of breakout rooms. Google Hangouts/Meet frequently becomes the go-to solution for this option since multiple instances can be run. I did this with Google Hangouts for years before Zoom became popular. Merely provide a shared document with links to all the different rooms. It’s still a fallback option today but requires more preparation (and sometimes more facilitators).
We could discuss other options like GoToMeeting or AdobeConnect, but those platforms tend to be more control-focused and make it difficult to use with self-organizing teams.
Physical Step – timers
Some steps become trivial to convert from location-based to online, such as:
• Each person gets 90 seconds
Many tools have timers built in (e.g., Zoom, has an option to make the timer visible in each breakout) or you can use stand alone timers. The key question to ask when coming up with options is how do you let participants know?
Some facilitators like to display the timer throughout an exercise. So you need to consider how your meeting tool supports sharing the timer as a built-in feature or some type of screen share.
Or you may decide that having the timer display throughout a breakout might put stress on participants which may not be part of the exercise. In this case, you need to make sure you have a text chat or audio capability where you can let all participants in the breakout know time remaining at certain intervals. Any skilled facilitator has this woven into their practice.
Physical Step – move next to a person and place a hand on their shoulder
The last physical step may produce some concern at first.
- (for debrief/plenary) – Ask everyone to remember the most powerful story, go over to that person, and place your hand on their shoulder.
What is the purpose of this step in the location-based exercise? One might answer: affinity. You need to find a way for participants to show how they connected with individuals and their stories.
So you may want to translate how to show “affinity” online. To keep things simple, we focus on showing affinity in two dimensions. Three dimensional solutions present new opportunities and challenges for an online facilitator that are beyond this article.
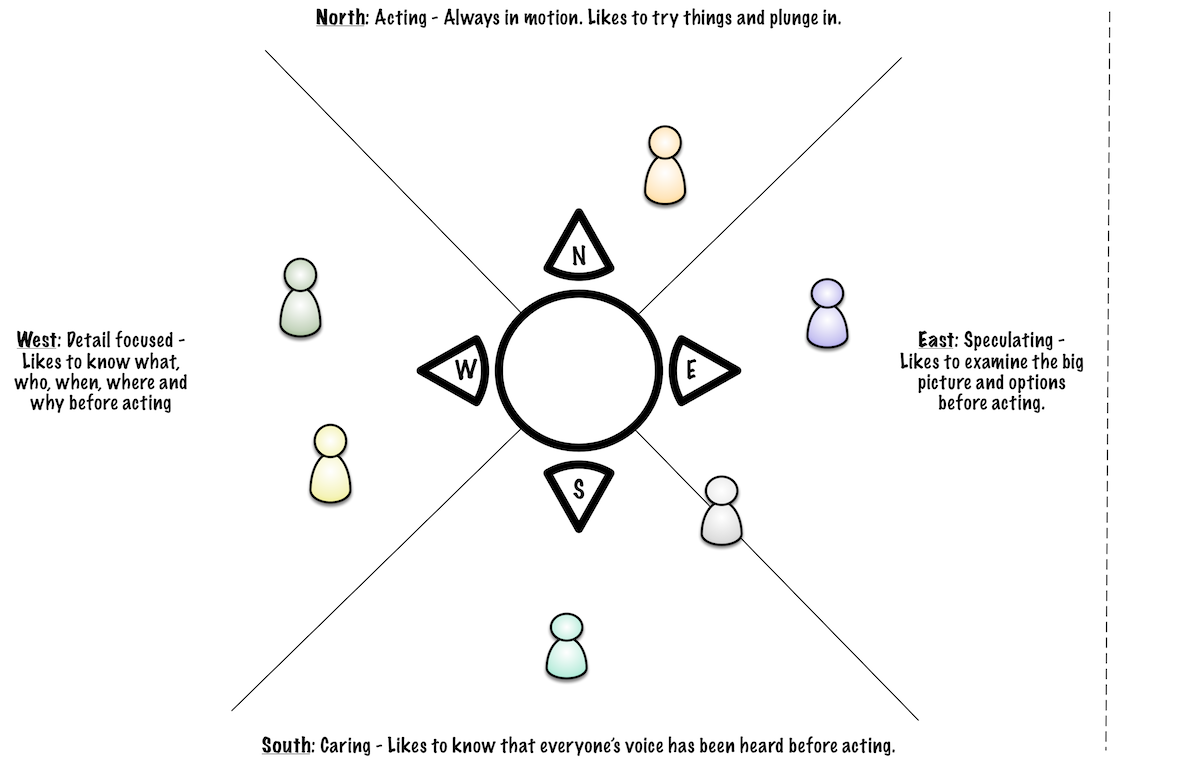
For our two-dimensional affinity, we will look at shared online white boards. Avatars a placed on the board and moved relative to each other show affinity. An example I’ve written about previously is the Compass Activity (see image below). The differentiator to determine best options depends on how participants can move avatars around the shared whiteboard to show their affinity.
Option 1: Real Avatars
Miro.com and mural.co both provide the ability to assign accounts and allow for participants to set their own avatars that they move around the whiteboard with their mouse. For other participants to recognize them requires the avatar have a participant’s name and a recognizable picture.
Option 2: Look-alike Avatar proxies
When you don’t have a built-in option, like described in option 1, you still have alternatives. You could use avatars of participants based on what they use in a chat tool or social media.
When working internally with long-established teams, using team member avatars from their team chat tool makes it easier for them to recognize each other in the exercise.
If a team member doesn’t have an avatar set up in chat or another shared tool, I take creative approaches. Sometimes they choose not to have an avatar because they are shy or they couldn’t think of anything clever. As a service to them and the rest of the team, I’ll ask for a quick 1-1 meeting, ask if I can take a screen capture of them and then offer to adjust the image for them. Usually, I’ll find out a hobby or interesting fact their team members will know about them and create an avatar for them. The team sees the new avatar at the beginning of the exercise. Warning: one custom avatar tends to spawn other custom avatars by the team. A clever facilitator may even incorporate this into future exercises to reflect the playfulness on the team and the strengthening of team identity.
It’s always best to get the participant’s permission in advance before creating the avatar and having them preview and approve it.
Option 3: Generic Avatar proxies
If you are running an exercise where many people do not know each other, another approach is have the participants pick any image at the beginning to represent them. Thanks to Jay-Allen Morris and Kirsten Clacey who introduced me to this option. Using the image selection as a warm up exercise for introductions allows this option to serve two purposes.
Choose Plan A and Plan B
Now that you have some options, how do you choose what to use? You need to consider a few criteria for the upcoming event as shown below.
Pick one option as your Plan A based on:
- What options are tools and techniques the participants already know or could quickly learn?
- What similar tools and techniques have participants used in other events?
- What other tools will participants use in this event?
- Are these tools accessible through firewalls, other external security measures, or other security settings within the tool?
- How many participants will I have and do I have a technical producer to assist with some of these options within exercises?
You may think of other criteria. Regardless, familiarity, ease of learning the tool, and ability to learn through the exercise become the key decision factors. This is why you don’t want to use too many different tools in an online event.
However, “plan A” becomes the option where most of these criteria can be clearly and easily answered and incorporated into your facilitation plan.
“Plan B” becomes the runner up with respect to these criteria and should be prepared if you are anticipating network failure, tool failure, or some other kind of challenge that makes it impossible to move forward with Plan A.
Sometimes for much larger online groups (over 25), I may even work out plan C and prepare to have it ready for certain parts of the facilitation.
Moving further into virtual facilitation
Hopefully, this article provided ideas on how to translate a location-based activity to an online activity. For more ideas, you may wish to sign up for my newsletter or join me in an upcoming online facilitation workshop.

Member discussion: